The Fair Isle Sampler Poncho

I Finally Finished!

I loved this project. I combined a desire to practice my Fair Isle technique with a need to reduce my stash and the result is beautiful. (If I do say so myself).

The pattern is a simple rectangle 124 stitches wide (120 for the pattern + 2 on each edge) with a garter stitch border on the bottom and open side. The top was knitted together using an I-cord from the bottom edge to the neck opening. The neck opening is several rows of knitting to create a curled “collar”.

IMG_0715

The Fair Isle patterns all came fromĀ 200 Fair Isle Motifs: A Knitter’s Dictionary.

IMG_0675

I chose motifs simply by making sure the stitch count would multiply evenly to 120.

I can think of several more variations on the Basic Rectangle Poncho. A stitch sampler rather than a Fair Isle sampler. Cable practice. Lace stitch practice.

Use your imagination to create your own one of a kind poncho.

‘Static Happy Knitting!

Stash Busters

At a certain point every knitter looks into a craft closet or a corner of the room and confronts bags, boxes or piles of yarn leftover from all those wonderful projects we’ve created.

Sometimes we just close our eyes and pretend it’s not that bad. Sometimes we manage to suck it up and organize the mess according to yarn weight or fiber or even both.

Yea! Now we have an organized mess of leftovers.

I challenge you to get inspired and do something with all of that lovely yarn.

Stash busters can be large blankets or small kid’s socks. Hats or scarves. Or if you’re really creative, sweaters. (I myself have not been brave enough to attempt the sweater)

IMG_0482

My daughter loves her mismatched ugly stash buster socks. (So much that I couldn’t get my hands on any of them for a photo)

I’ve done blankets and socks. My current project is a stash busting poncho that is doing double duty by giving me a chance to work on my Fair Isle technique.

IMG_0472

I have noticed one insidious evil that can creep into your best stash busting intentions…. the urge to buy more yarn to make the project bigger or maybe fill in “missing” colors. Resist! Make it a real challenge and make do with what you have.

Share your Stash Busting Ideas with the rest of us we can all use a new idea.

‘Static Happy Knitting!


3 Types of Books Every Knitter Needs

I Love Books. All types of books.

This means I have bought my fair share of Knitting books. I even have the one with patterns to knit your own dog.

But there are three specific types of knitting books that I turn to over and over to get my money’s worth out of them every time. Recipe Books, Stitch Dictionaries, and How To / Tips.

Recipe books teach you how to measure, calculate rows and stitches, and put the parts together for various garments. Like these two for creating Top Down Sweaters:

IMG_0450

Stitch Dictionaries are just what the name implies, page after page of various knitting stitches. The two below are excellent examples. The 400 stitch dictionary has everything from basic garter and stockinette stitch to very complicated cables and lace. The 200 Fair Isle Motif book contains patterns from 2 stitches to 30 stitches and an equal number of rows.

IMG_0451

How To is also self explanatory. The one below is compact and has answers to most any question that might come up.

IMG_0453

I’m sure if you look you will find a few favorites of your own. One last piece of advice, I love Ebooks but most of the time I find I like my knitting books to be of the real paper type. Of course you may feel the exact opposite.

I’d love it if you’d share some of your favorites with me!

‘Static Happy Knitting!

Lottery Fever

When the lottery went up into the stratosphere recently, I thought about what I’d do if I won. (Didn’t we all)

Yes I’d buy a new house and take a vacation or two, invest, set up trusts for the kids. Blah blah blah.

But would I still knit? Would I still get a thrill out of watching a pair of socks appear on my needles?

The answer is yes.

I’d just do it with more expensive yarn. I’d peruse the Knit Picks Catalog and order skeins and skeins of whatever struck my fancy. I’d go to Eat, Sleep, Knit and fill my basket with all the soft, hand dyed yarn that excited my fingers when I touched it.

Like the Silk blend Ā from Eat Sleep KnitĀ I used on this scarf:IMG_0436

This yarn just slid onto my needles. What fun to knit with something so nice.

I’d knit without worry about hand washing because I could afford to have things professionally cleaned.

I’d knit afghans with silk, wool blends.

Cashmere sweater? Oh yeah.

Let’s face it, quality yarn can be expensive. But, I gotta say, if I’m going to put in the hours to knit a sweater, I’m not going to use cheap yarn.

So I can dream about not worrying over the price of a skein of yarn or feeling guilty if a project goes unfinished.

For now I’ll just have to pick my projects with care.

‘Static Happy Knitting!

The Travis Hat: Free Pattern

A few years ago my son found a slouch beanie online that he loved. He wasn’t happy with the price and asked me to look at it and see if I could make something similar.

I played around with the pattern and proportion and finally came up with The Travis Hat.

That first hat started something. His friends started asking where he got the hat, my daughter wanted one and then her friends and before I knew it I’d knitted probably a dozen of them.Ā I used a soft acrylic sport weight yarn in lighter colors to highlight the pattern.

I hope you like it too. ‘Static Happy Knitting!

Super Simple Travis Hat The Pattern:

1 Skein soft sport weight yarn

Gauge: 6 St / IN with # 4 circular
Row doesn’t matter as you’ll be measuring.

This is for a man’s size (24 in around)

K = Knit. P = Purl

Cast on 140 st. (I use magic loop method)
Join in round.

K2 P2 Rib until hat measures @ 1″ (or whatever looks good to you)

Pattern Row 1: *PKKP KPKPKP Repeat from * around.
Pattern Row 2: *PKKP PKPKPK. Repeat from * around.

Repeat Rows 1 and 2 until hat measures 11-12 inches tall.

(You will notice the PKKP produces a rib and the KPKPKP / PKPKPK section is a seed stitch pattern between the ribs.

Once the hat measures 11-12 in. You will begin reducing every other row by knitting two stitches together in the seed stitch section between the ribs.
After you’ve reduced away the seed pattern, purl together the purls in the rib until you have Only PKK repeat.

Cut a long tail and thread onto a yarn needle. Slip all remaining stitches onto the needle and pull tight. Turn hat inside out, knot. Weave in ends.

Tip: I put a stitch marker at the end of each pattern repeat to make things easier until the pattern becomes obvious.

IMG_0420IMG_0430

IMG_0425IMG_0431

You’re done!
‘Static Happy Knitting!

Needles Needles

I’m not a knitting historian but somewhere back in time our knitting ancestors got by just fine with a couple of sharp sticks of about the same diameter. They figured out how big stuff would be using their particular set of needles and their particular tension and even their particular homespun yarn.

Lucky for us all that has changed and we can buy beautiful standardized needles in nearly endless varieties.

Try them. Try them and find the ones you love.

I have knitted with straight aluminum needles, circular aluminum needles, plastic varieties of both and bamboo varieties of both. I have used interchangeable circulars and single sized circulars. I can’t even remember all the brands.

I finally settled on what works for me.

And the winner is . . .

Knit Picks Circulars. (http://knitpicks.com) Single size for those too small to be interchangeable and interchangeable for all the available sizes.

This is a sampling:

IMG_0407

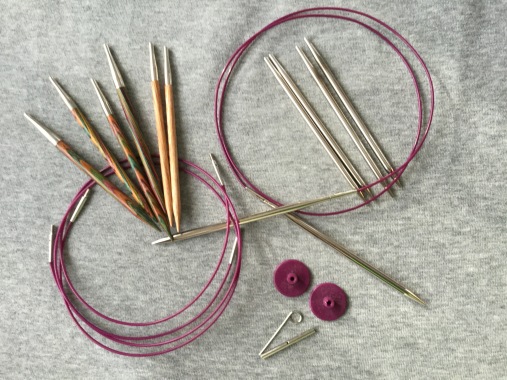
I knit everything with these needles. Everything.

First and maybe most important, these needles are affordable. They’re comparable in price to needles you can buy in craft stores. You don’t have to pay a premium to get these high quality needles.

Next, the cables are super flexible which is a big deal when you’re using the magic loop technique.

They have a needle type for every need. I have two complete sets. One set of nickel plated tips for speedy, smooth knitting. One set of rainbow wood tips for those times when you want your needles to “hold” the yarn a little better like cables or lace. I’ve recently picked up a fewĀ Sunstruck wood tips just because I think they’re pretty. Ditto the Caspian wood tips. (I can justify the Sunstruck because they’ll provide a little more contrast with darker yarn.)

The quality is great. I knit a lot. Socks, sweaters, scarves, blankets, hats, and on it goes. I’ve never replaced a tip. I’ve had one cable break at the joint from wear which wasn’t a big deal because the replacement cables are not expensive.

Which brings me to my next point. The cables come in any length you need and the price means having multiple options won’t break your bank.

I said I knit everything on circulars and I do. I don’t need to have straights, DPNs and circulars when I can do the job with circulars alone. Learning the Magic Loop technique changed my life. Really. Find a video on YouTube and learn it.Ā Knit Picks TutorialĀ  It’ll change your life too.

Why ‘Static Happy Knitting?

My grandson went through a phase of telling people he was “static happy” when he was in a particularly good mood. This was toddler speak for “ecstatic happy” which for some reason he seemed to think went together. So in our house being static happy means you’re, well, super happy.

I think knitting should make people static happy so my goal with this little blog is to have some fun and maybe help you wonderful beginner knitters over some of the bumps.

And hey if things get bumpy we can always laugh about it.

First Things First

Knit something ugly.

Here’s the deal, your first attempts at knitting will be awkward. The results will be messy and uneven. You’ll be tempted to throw up your hands in frustration and swear you’ll never be able to make a decent scarf, let alone that beautiful sweater you’re dreaming of.

My first project (waaaay back in the day) was a set of golf club covers. I think there were four or five of them. Each one was a different size and shape and I’m pretty sure none of the sizes and shapes looked anything like the pattern picture.

This is normal and okay for your first projects!

The problem is, that in addition to learning how to move the yarn, the needles and your fingers to make something sort of like a knit stitch, you have to maintain an even tension in the yarn to make the stitches look like proper little soldiers all in a row and all the same size.

No one can do all of this the first time out. Or probably the second. Maybe not the third. Or . . . Well you get the picture.

Give yourself permission to make an ugly misshapen scarf. Go buy yourself a skein of cheap yarn in a bright happy color, or better yet a bright happy multicolor and a circular knitting needle. Cast on twenty or thirty stitches and just do it. Once you wrap the thing around your neck and stuff parts of it under a coat collar the ugly bits probably won’t be noticeable.

IMG_0017

You could also try some dishcloths since size doesn’t matter there, and really who pays attention to a dishcloth?

Keep trying and at some point, you’ll look down and see rows of neat, uniform stitches lining up on your needle.

One more thing about tension, everyone does it different. Some of us are loose knitters, meaning our stitches will naturally be larger. Some of us knit tight, tiny stitches. Do what comes natural to you and when the time comes to knit something where size matters you can change the size of your needles to make the pattern work for you. (That’s a whole long discussion about gauge and swatches for another day)

For now, just get to work knitting something ugly. It’ll be fun.

‘Static Happy Knitting!